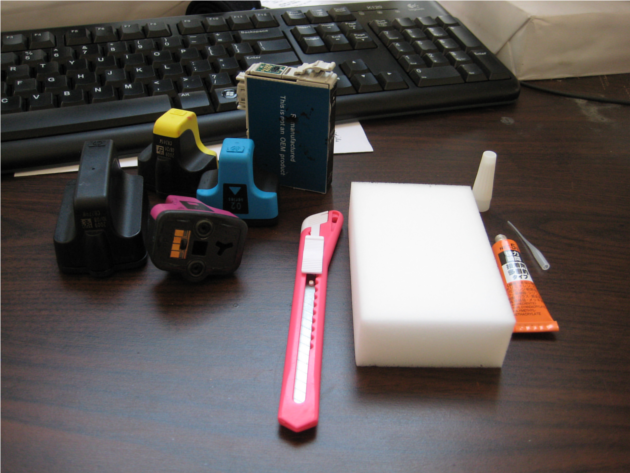
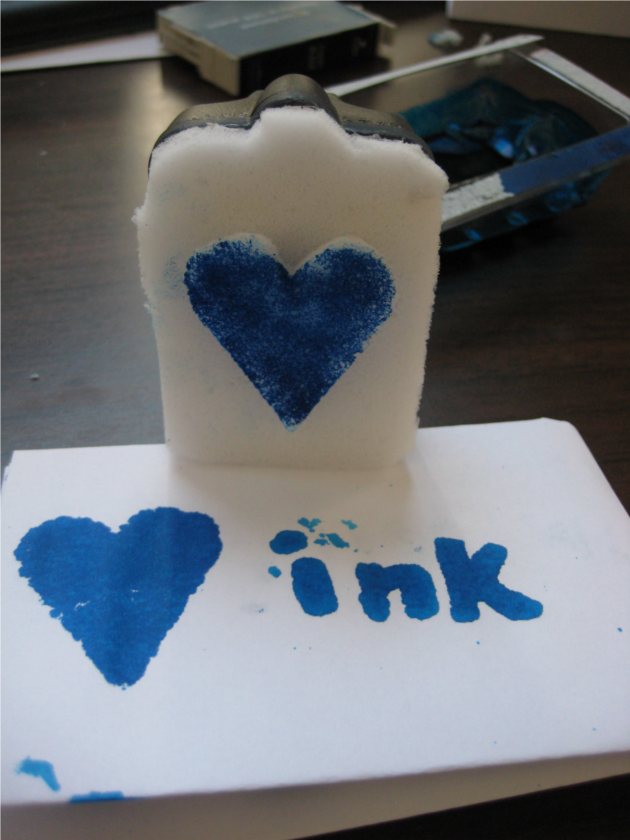
 I used the same cartridge types since their shape lends well to stamps. I didn’t have Styrofoam like Upcycled Design Lab, but I was able to find a few sponges that worked well.
 I outlined each ink cartridge on the cardboard packaging from the superglue to make the base of my stamps. Originally, I envisioned separating the sponges into three or four different equal-sized pieces and making the stamps from that. It was much harder than anticipated, however.
 For the next few hours I struggled with cutting straight lines into the sponges. I would start out with a straight cut down, only to realize that one end bent and I had two parts that curved. In the end, I gave up and my stamps are a bit wonky because of it.
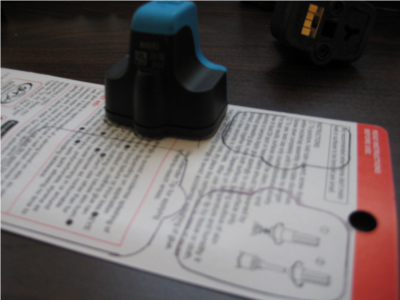
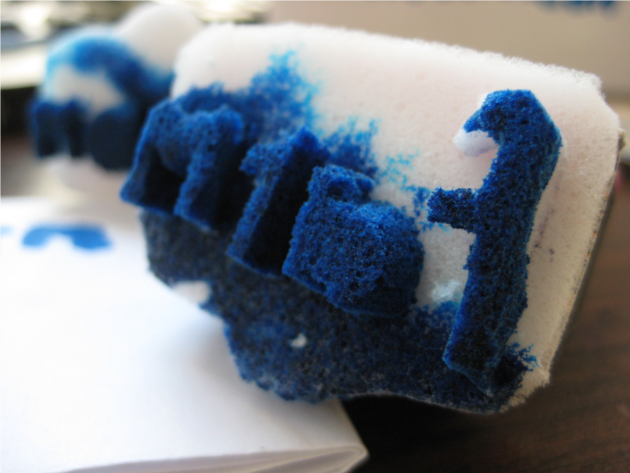
Each of the letters were cut carefully and glued to a sponge base that was glued to a piece of cardboard. After shaving off bits of uneven plastic on the cartridges, I glued the cardboard to the base.
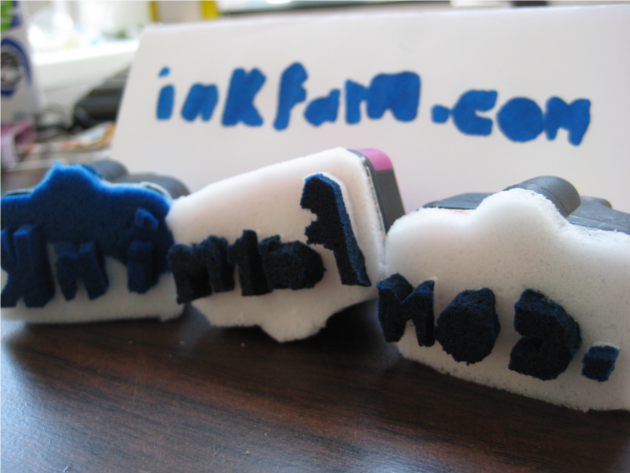 Voila! Stamps!
But then I realized I forgot to buy an ink pad. I scoured the rest of my ink cartridge cache until I found some that still had ink. This was where things got messy, really messy.
Using the razor that I had, I gouged the soft rubber parts of the ink cartridge and pulled them out, draining the ink into a shallow plastic container.
 If you are following in my footsteps, be sure to have set up newspaper or a work cloth underneath the drain pan and ink cartridge so that your table doesn’t get stained.
I did not think of that beforehand my work desk and keyboard are now blue just don’t tell my boss.
Best Toner Saving Printers of 2016
Best Ink Saving Printers of 2016
Recommended Ink Saving Fonts
What the Font?
1 Comment
April, 2016
Best Toner Saving Printers of 2016
Best Ink Saving Printers of 2016
June, 2015
Best Ink Saving Printers 2015
May, 2015
Customers Love Inkfarm
Customers Love Inkfarm
May, 2014
Aspiring Business Contest Winners
March, 2014
Win A Printer For Your Business Or Start-Up!
February, 2014
Best Ink Saving Printers 2014
January, 2014
New Year, New Beginning Contest Winners
3D Printing for 2014
December, 2013
Printing Nuances and How to Fix Them
"New Year, New Beginning" Photo Contest Guidelines
Printable Holiday Elf Decoration
November, 2013
Printable Thanksgiving Decoration
September, 2013
2013 DIGITAL INNOVATION SCHOLARSHIP WINNER
July, 2013
About the Lexmark 200xl compatible ink cartridges
Page yield ratings and coverage percentages explained
Black and Tri-color cartridge pre-installation guide
Multi-color cartridge pre-installation guide
Alien Earth Photo Contest Winner
May, 2013
"Alien Earth" photo contest entry guidelines
Digital Innovation Scholarship 2013
Best Toner-Saving Laser Printers - 2013
April, 2013
Epson ink cartridge pre-installation guide
March, 2013
Best Ink-Saving Printers 2013
October, 2012
Breathtaking Portraits Photo Contest Winners
September, 2012
How Planned Obsolescence Affects You
$100 Photo Contest
August, 2012
GeekGirlCon 2012 Review
Drupa 2012 highlights
July, 2012
2012 Consumer Printer Trends
Laser Printers vs. Inkjet Printers: Pros and Cons
Sizzling Summer Photo Contest Winners
June, 2012
Why is Printer Ink so Expensive?
Genuine vs. Remanufactured and Compatible Cartridges
Funniest Candids Photo Contest Winners
May, 2012
A Glossary of Popular Printer Terms
Crafty Fridays: Printer Ink Cartridge Stamps
How to Make a Shower Karaoke with your iPad!
Almost Human Photo Contest Winners
Upcycling Ink Cartridges
April, 2012
5 Tips on Saving Printer Ink
Top 4 Printers of 2012
Best Ink-Saving Printers - 2012
Free Ink Giveaway
Talking GeekGirlCon with Susie Rantz
Beat the Winter Blues Photo Contest Winners
March, 2012
Laser "Un-printer" Wipes Paper Clean
Owning a Hackerspace: An Interview with Matt Westervelt
Instaprint: The Polaroid of Today?
Why you Should Print your Tax Return
H&R Block Online: How to Print your Tax Return
TurboTax Online: How to Print your Tax Return
How to get Copies of Previous Tax Returns
Printing from the Cloud
iPhone Photo Contest Winners
January, 2012
Seasons Greetings Photo Winners
December, 2011
Saving Your Photos in the Digital Age
12 Great and Free Holiday Fonts
Urban Black and White Winners
October, 2011
Photography Contest #2- Awesome Autumn
Kodak Stock in Free-fall
September, 2011
Bright and Beautiful Colors Winners
Photo Contest Terms and Conditions
August, 2011
DPI and Image Size
Printing On Photo Paper
Google Cloud Print From Your Android Phone
Google Cloud Print From Your iPhone
Digital Camera Modes
Photo Paper Types
GIMP Tutorial: Introduction GIMP Tools
The Cost of Digital Cameras
Compatible FAQ
July, 2011
Image File Extensions
Color Management Basics Page 3
Color Management Basics Page 4
Color Management Basics
Color Management Basics Page 2
Apple Loses in Kodak Patent Suit but Kodak Stock Falls
June, 2011
Printer Software for Saving Ink
Conservation and the Environment
Recommended Ink Saving Fonts
Best Printers for Saving Ink - 2011
May, 2011
Printer Ink - Toxic?
March, 2011
Holy Fonts, Batman!
What the Font?
Are Page Yield Ratings A Scam?
Thanks for the link and for sharing your projects with me.
Cindy